Are you struggling with network issues or looking to optimize your home or office network setup? Understanding and enabling BGW320 IP Passthrough could be the solution you need.
In this easy-to-follow guide, we are going to explore what BGW320 IP Passthrough is, and provide a step-by-step approach to enable or disable it.
What Is BGW320 IP Passthrough?
IP Passthrough is a feature available in the BGW320 gateway, a device provided by AT&T for its fiber internet services.
Essentially, IP Passthrough allows you to bypass the built-in router of the BGW320, enabling another router or networking device to obtain the public IP address directly from the ISP.
This is useful for users who want to have more control over their network, such as implementing advanced security features, custom configurations, or optimizing network performance.
Benefits Of Enabling IP Passthrough On BGW320
If you are asking yourself whether you should enable IP Passthrough here are some of the benefits we would like to point out.
Enhanced Network Performance
By allowing your own router to handle all routing duties, you may experience improved network efficiency and speed.
Advanced Security Features
Use the advanced security features of your own router for better network protection.
Custom Configuration
Tailor your network settings to your specific needs, without being limited by the BGW320 router capabilities.
How To Enable BGW320 IP Passthrough
Here is a detailed breakdown of each step you have to take in order to enable BGW320 IP Passthrough.
Take A Note Of Your Router MAC Address
You will need the MAC address of the router you want to enable IP Passthrough for so make sure to write it somewhere before you start following the steps below. The MAC address is often printed on a label on the bottom or the side of the router.
Access The BGW320 Gateway Interface
Before you start, ensure your device (computer, tablet, etc.) is connected to the BGW320 network. You can connect the device either through a wired Ethernet connection or via Wi-Fi.
- Open any web browser on your connected device.
- In the browser’s address bar, type
192.168.1.254and press Enter. - After the login page loads, you might be asked to enter the Device Access Code. If you haven’t changed the default settings, you can find the Device Access Code on the back of the BGW320 unit. You will need this code to make any changes to the settings.
- After logging in, you will be directed to the admin dashboard of the BGW320 interface.

Navigate To The IP Passthrough Settings
- From the admin dashboard, look for the “Firewall” tab in the top menu.
- Click on it to show additional options.
- In the expanded menu under “Firewall”, find and click on “IP Passthrough”. This will open the settings page specifically for configuring IP Passthrough.
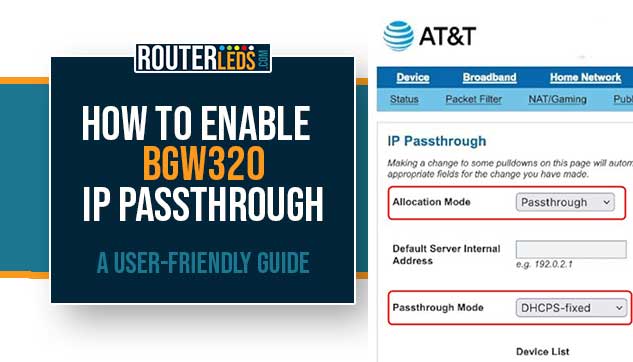
Configure IP Passthrough Settings

- On the IP Passthrough page, as Allocation Mode select “Passthrough” from the drop-down menu.
- As Passthrough Mode select “DHCPS-fixed”. This mode allows you to assign the public IP address to a specific device on your network.
- Below the Passthrough Mode settings, there is a Device List option to choose the device for IP Passthrough. This list shows all devices currently connected to your network.
- Select the device (usually your personal router) that you want to assign the public IP address to. Make sure you pick the correct device to avoid network issues. This is where you need to know the device’s MAC Address mentioned in the beginning.
- Click on the “Save” button to apply these settings. Your BGW320 gateway will now pass the public IP address to the chosen device.
Finalize The Setup
After saving your settings, it is recommended to restart both the BGW320 gateway and the device set for IP Passthrough. Normally it will take more than two minutes for the IP Passthrough to become active.
NOTE: Now you should disable the ATT BGW320 modem built-in WiFi (for both 2.4 and 5GHz) if you want to use the WiFi on your router. You should also disable all the Firewall Advanced rules in order to avoid being blocked.
BGW320 IP Passthrough Troubleshooting Tips
If you experience any issues after you enable IP Passthrough, like connectivity problems or devices not being recognized, consider the following:
- Double-check the selected device in the IP Passthrough settings.
- Make sure that your device settings (like DHCP settings) are compatible with IP Passthrough.
- Restart your devices, including any connected routers or modems.
- If issues persist, resetting your BGW320 to its factory settings can help, but this should be a last resort.
By following these detailed steps, you should be able to successfully enable IP Passthrough on your BGW320 gateway.
How To Disable BGW320 IP Passthrough
If you decide that IP Passthrough is not suitable for your needs, you can easily revert to the default settings.
- Access the BGW320 admin interface as described above. Use a wired connection to connect the device.
- Go to the “Firewall” tab and select “IP Passthrough”.
- Change the Allocation Mode to “Off” and save your changes.
Frequently Asked Questions
Yes, enabling IP Passthrough can enhance network speed and efficiency. It allows your own router to manage the network traffic more directly, which can lead to improved performance.
IP Passthrough itself does not directly affect Wi-Fi connectivity as it is more related to how your network handles external traffic. However, the router or device you use with IP Passthrough may impact your Wi-Fi performance depending on its specifications.
Enabling IP Passthrough can be beneficial if you have a sophisticated network setup or require specific features from another router. It is ideal for users that need advanced network management and customization.
No, IP Passthrough and Bridge Mode are not the same. IP Passthrough allows a single device to bypass the gateway’s router, receiving the ISP’s IP address directly. In contrast, Bridge Mode disables the gateway’s router functionality entirely, allowing another router to manage all network traffic. While both methods are used to avoid double NAT issues, their applications and impacts on network management are different.
Conclusion
Enabling BGW320 IP Passthrough is a straightforward process that can significantly enhance your networking experience.
By following the steps outlined in this article, you can unlock the full potential of your network. Remember, if you encounter any difficulties or have questions, don’t hesitate to contact support for assistance.